I am back from the wilds of Northumberland. I had a thoroughly enjoyable and relaxing two weeks and came back with a cool bag full of cheese and meats from up North. I have been back for a couple of days but I've had no time to blog unfortunately what with work and sorting the house out.
One of my last meals before I went on holiday was shrimp boil. I saw this on an episode of Man vs Food and have wanted to make it ever since. My Mum gave me some corn on the cob from her garden and that meant that I definitely had to try it out. I have to say it was truly delicious and I am definitely going to make it again. The prawns were juicy and the spice from the old bay was incredible with the spicy merguez sausages and the flavours of the corn and potatoes.
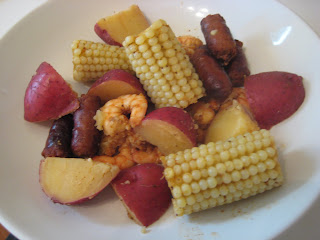
Shrimp Boil
(Serves 2) (adapted from Cooking For Two by America's Test Kitchen)
1 tsp vegetable oil
4 merguez sausages, cut into 1 inch lengths
1 cup water
3 tsp old bay seasoning
2 garlic cloves, smashed
1 tsp tomato paste
1 bay leaf
1/2 lemon, halved
2 ears of fresh corn, husks and silks removed, cut into 2 inch rounds
8 oz red potatoes, halved if small, quartered if large
8 oz large shell-on prawns
1 tbsp minced fresh parsley or spring onions (optional)
Heat the oil in a medium saucepan over a medium-high heat. Add the sausage and cook until well browned, about 5 mins. Stir in the water, 2 tsp of the old bay seasoning, garlic, tomato paste, bay leaf, lemon, corn and potatoes and bring to the boil. Reduce the heat to medium low, cover and simmer until the potatoes are tender about 15-20mins.
In a medium bowl toss the prawns with the remaining old bay seasoning. Scatter the prawns in a single layer on top of the veg. Cover and continue to simmer until the bottoms of the prawns turn pink, about 1 min.
Flip the prawns, then remove the pan from the heat, cover and let sit until the prawns are just cooked through, about 2 mins. Strain the stew reserving the broth if desired, and discard the lemon, garlic cloves and bay leaf, sprinkle with the parsley or scallions if using.
Tuesday, 31 August 2010
Wednesday, 18 August 2010
Basil and Lemon Chickpeas with Mackerel
I am off on holiday tomorrow for just over a week, so this will be my last entry until I get back as there is no Internet, although hopefully I'll be doing lots of cooking, as well as entering my Victoria Sponge cake into the local village show. I left for my parents house yesterday and one of my last clean out the freezer and fridge meals was this mackerel and chickpea dish, it was really simple to make and the only change I made from the original recipe was the addition of some green beans, which needed eating. It was also really tasty.
Basil and Lemon Chickpeas with Mackerel (adapted from Good Food Magazine July 2008)
(Serves 4)
3 tbsp olive oil, plus extra for drizzling
1 bunch spring onion, sliced
1 large garlic clove, crushed
zest 1 lemon and squeeze of juice
2 x 400g can chickpeas, drained and rinsed
100g green beans, chopped in half
150ml vegetable stock
85g sundried or fresh tomatoes, halved
4 mackerel fillets, skin on
1 large bunch basil
Heat 2 tbsp oil in a large, shallow pan. Add the spring onions, garlic and lemon zest, then cook for 2 mins until the onions are tender but still very green. Add the chickpeas, then stir until well coated in the onion mixture. Lightly crush with a potato masher, then add the stock, green beans and tomatoes. Simmer for 3-4 mins or until the liquid is absorbed, then set aside to cool slightly.
Meanwhile, heat the remaining oil in a large, non-stick frying pan over a medium heat. Season the mackerel fillets on both sides and fry for 3 mins each side, starting on the skin side. You'll probably need to cook these in two batches.
Add the basil and a squeeze of lemon juice to the chickpeas, then season to taste. To serve, spoon the warm chickpeas onto serving plates, drizzle with a little extra olive oil and top with the mackerel fillets.
Monday, 16 August 2010
Tuna Teriyaki with Noodles
I made dinner for a friend of mine on Friday night. She is lactose intolerant so Chinese or Japanese is always a good bet for avoiding dairy. This was really simple and quick to make, She has a salmon fillet and this worked just as well with the salmon. The original recipe didn't call for all the veg, but I needed to use it up so added it in.
Tuna Teriyaki with Noodles (adapted from http://www.weightwatchers.co.uk/)
(Serves 2)
3 tablespoon teriyaki sauce
1 tablespoon lime juice
1 teaspoon chilli powder, mild, or ½ tsp dried chilli flakes
350 g tuna steak
1 clove garlic, crushed
300 g straight to wok noodles
1 big flat mushroom, sliced
1 yellow pepper, sliced
1 medium courgette sliced
1 tablespoon fresh coriander, chopped
1 portion stock cube, vegetable – made up to 300ml with hot water
Mix together the teriyaki sauce, lime juice and chilli powder or dried chilli flakes in a shallow, non-metallic dish. Add the tuna steaks and stir to coat, leave to marinate for about 30 mins, keep the marinating liquid
Heat some oil in a wok or large frying pan. Add the garlic and stir-fry for 2 minutes, then add the mushroom, pepper and courgette. Stir-fry over a high heat for 2-3 mins.
Add the noodles to the pan with the coriander, reserved marinade and hot vegetable stock . Cook gently for another 2-3 minutes
Meanwhile, heat some oil in a another pan and cook the tuna for a couple of minutes on each side.
Share the noodle mixture between 2 warmed bowls, place the tuna on top and serve at once.
Sunday, 15 August 2010
Chinese Pork Noodle Soup
I love dishes I can cook all in one pot, it makes the cooking and the washing up so much easier! I have no idea if the Chinese actually do noodle soups but I couldn't resist trying it out. I am trying to clear out the freezer as I go on holiday next week and I am hoping to go to the farm shop to stock up on meat again. One of the best things the farm shop sells is stir fry meat, they chop it all up for you and you're ready to go. This is where the pork for this dish came from. I'm not a huge fan of boiled meats but with the five spice and soy sauce in the broth you couldn't taste that the pork had been effectively boiled. It was really tasty and filling.
Chinese Pork Noodle Soup (adapted from Good Food Magazine December 2006)
(Serves 4)
400g pork tenderloins, cut into long thin strips
600ml chicken stock
1 tbsp soy sauce
2 tsp Chinese five-spice powder
large knob of ginger, peeled and cut into matchsticks
200g dried egg noodles
100g spinach, roughly chopped
100g mushrooms, sliced
100g green beans, chopped into 1 inch pieces
bunch spring onions, whites and greens sliced
Tip all the ingredients, except the spring onion into a large saucepan, put the lid on and bring to a gentle simmer.
Cook, without boiling, for about 8 mins, until the pork has changed colour and the greens are cooked, but still a bit crunchy.
Ladle into bowls, scatter with the spring onion.
Saturday, 14 August 2010
Daring Cooks August 2010: Pierogi
The August 2010 Daring Cooks’ Challenge was hosted by LizG of Bits n’ Bites and Anula of Anula’s Kitchen. They chose to challenge Daring Cooks to make pierogi from scratch and an optional challenge to provide one filling that best represents their locale.
I really enjoyed this challenge. I love making both the filling and the dumpling wrapper and managed to get flour all over the kitchen in the process, but it was fun! I have only ever eaten store bought pierogi before but these were so much better and the frying tip was spot on. It makes them lovely and crispy on the outside and more interesting, to my mind, than just boiled ones.
I made the Russian style pierogi and halved the recipe as I was making them just for me but I still ended up with 25 dumplings and enough filling leftover to make four potato cakes to have with dinner! not sure how I managed that! I didn't have time to think of ideas for local fillings, so I missed out that bit of the challenge but I can totally recommend the Russian style ones, they were delicious.
Russian Style Pierogi
(makes 4 generous servings, around 30 dumplings)
Dough:
2 to 2 1/2 cups (300 to 375 g) all-purpose (plain) flour
1 large egg
1 teaspoon (5 ml) salt
About 1 cup (250 ml) lukewarm water
Filling:
3 big potatoes, cooked & mashed (1 1/2 cup instant or leftover mashed potatoes is fine too)
1 cup (225 g) cottage cheese, drained
1 onion, diced & sauteed in butter until clear
3 slices of streaky bacon, diced and fried till crispy (you can add more bacon if you like or omit that part completely if you’re vegetarian)
1 egg yolk (from medium egg)
1 tablespoon (15 g) butter, melted
1/4 (1.25 ml) teaspoon salt
pinch of pepper to taste
Combine all the ingredients for the filling (it’s best to use one’s hands to do that) put into the bowl, cover and set aside in the fridge until you have to use it.
Place 2 cups flour in a large bowl or on a work surface and make a well in the center. Break the egg into it, add the salt and a little lukewarm at a time (in my situation 1/2 cup was enough). Bring the dough together, kneading well and adding more flour or water as necessary. Cover the dough with a bowl or towel. You’re aiming for soft dough. Let it rest 20 minutes.
On a floured work surface, roll the dough out thinly (1/8” or about 3 millimeters) cut with a 2-inch (5 cm) round or glass (personally I used 4-inch/10 cm cutter as it makes nice size pierogi - this way I got around 30 of them and 1 full, heaped teaspoon of filling is perfect for that size).
Spoon a portion (teaspoon will be the best) of the filling into the middle of each circle. Fold dough in half and pinch edges together. Gather scraps, re-roll and fill. Repeat with remaining dough.
Bring a large, low saucepan of salted water to boil. Drop in the pierogi, not too many, only single layer in the pan! Return to the boil and reduce heat. When the pierogi rise to the surface, continue to simmer a few minutes more ( usually about 5 minutes). Remove one dumpling with a slotted spoon and taste if ready. When satisfied, remove remaining pierogi from the water.
Serve immediately preferably with creme fraiche or fry. Cold pierogi can be fried. Boiled Russian pierogi can be easily frozen and boiled taken out straight from the freezer.
Wednesday, 11 August 2010
Linguine with Courgette and Sage
I'm still going with the courgette recipes! Although I'm now giving away more than I'm eating. I keep ending up with giant ones that I can't eat by myself even in 2 sittings!! I also love simple recipes and this on fitted the bill perfectly. It's basically a vegetarian carbonara with courgette and sage. This one also intrigued the cat who sat and watched me eat it. I think it was the long strands of linguine she was interested in!
I am entering this into this weeks Presto Pasta Nights hosted by Siri of Siri's Corner. Check out her blog on Friday for the round up.
Linguine with Courgette and Sage (from Good Food Magazine February 2005)
(Serves 2)
200g linguine
4 tbsp cream
4 egg yolks
6 tbsp grated parmesan
butter
a handful of small sage leaves
2 courgettes, grated
1 lemon, halved
Cook the pasta following the packet instructions. Whisk the cream and egg yolks together. Drain the pasta and then tip it back into the saucepan along with the egg mixture and Parmesan and stir. The heat from the pasta should cook the egg.
Heat a good knob of butter in a frying pan and fry the sage leaves and courgette until the butter starts to brown and they crisp up. Squeeze in a little lemon juice. Divide the pasta between 2 bowls and tip the courgette and sage mixture over.
Labels:
Courgettes,
Cream,
Eggs,
Herbs,
Lemon,
Pasta,
Vegetarian
Friday, 6 August 2010
Chicken with Lemon, Mustard and Tarragon Sauce
I had a break from the courgettes one day this week and had green beans instead, which also come out of the garden. I served them with this delicious Chicken with Lemon, Mustard and Tarragon Sauce dish. I love creamy sauces and this was fantastic, so flavoursome and tasty.
I served this with Spinach and Ricotta Gnocchi and Green Beans.
Chicken with Lemon, Mustard and Tarragon Sauce
(Serves 4)
1 tbsp olive oil
15g butter
4 chicken breasts
1 onion, finely chopped
2 cloves garlic, finely chopped
1 glass white wine
250ml chicken or vegetable stock
200ml double cream
1/2 lemon, juiced
1 tbsp grainy mustard
large handful fresh tarragon, chopped
salt and pepper
Heat the oil and butter in a heavy based frying pan over a medium high heat. Saute the chicken breasts for 2-3 mins on each side or until golden brown. Transfer to a plate.
In the same pan use the remaining butter mixture to gently fry the onions and garlic over a medium heat until really soft, about 10 mins. Add the wine and simmer for a few minutes. The add the stock, bring to the boil and simmer for a minute before whisking in the cream, lemon, mustard and half of the fresh tarragon. Bring to the boil and whisk thoroughly.
Return the chicken breasts to the pan, cook for 7-10 mins or until cooked through.
Scatter over the remaining tarragon and season to taste. Serve.
Wednesday, 4 August 2010
Potato Salad with Cervelas
I read A Moveable Feast by Ernest Hemingway a couple of months ago and in one scene he eats a potato salad with a large beer and a cervelas. Ever since reading that scene I have wanted to make the potato salad. It sounded so delicious.
"There were few people in the brasserie and when I sat down on the bench against the wall with the mirror in back and a a table in front. The waiter asked if I wanted beer, I asked for a distingue, the big glass mug that held a liter, and for potato salad.
The beer was very cold and wonderful to drink. The pommes a l'huile were firm and marinated and the olive oil delicious. I ground black pepper over the potatoes and moistened the bread in the olive oil. After the first heavy draft of beer I drank and ate very slowly. When the pommes a l'huile were gone I ordered another serving and a cervelas. This was a sausage like a heavy frankfurter split in two and covered with a special mustard sauce."
I googled pommes a l'huile, and it came up with this recipe, which isn't quite the same, but was the best I could find. I couldn't find a cervelas, which is a cooked sausage produced mainly in Switzerland, Alsace and in parts of Germany, so I used smoked pork sausage instead. It also added pickles, which weren't mentioned in the book. Overall this was a really tasty potato salad and the vinaigrette was delicious.
Potato Salad with Pork Sausage and Pickles
(Serves 4)
800g potatoes
100g cooked pork sausage
5 pickles
3 tbsp oil
1 tbsp vinegar
1 tsp mustard
Salt and Pepper
Wash the potatoes and cook in a saucepan of boiling water for 15 mins.
Drain the potatoes and cool them under the cold water tap. Cut them into strips.
Cut the sausage into slices or cubes. Drain the pickles and slice them into rounds. Toss the potatoes sausage and pickles.
In a bowl mix the vinegar and mustard, add the salt. When the salt is dissolved, add the oil and pepper. Just before serving sprinkle the salad with vinaigrette.
Sunday, 1 August 2010
Tuna Burgers
I am still trying to use up the tins of tuna I bought months ago! I'm really not a big fan of tinned tuna, but thought I'd give it one more go, so I bought 4 tins on offer in the supermarket and am slowly getting through them. The two recipes I've tried so far haven't reignited my love of tuna, in fact I haven't even bothered to post them here, but this one was different.
These tuna burgers were delicious, I think the addition of the apple really helped to dilute the weird tinned tuna flavour and the addition of the mustard on the bun was really good. I made four in total and froze the other three and I am looking forward to eating them already!
Tuna Burgers (adapted from http://www.weightwatchers.co.uk/)
(Served 4)
340g tinned tuna
1 medium apple, peeled, cored and grated
2 eggs
1 tsp dried oregano
1/2 tsp dried thyme
1/4 tsp salt
1/4 tsp pepper
50g dried breadcrumbs
4 medium burger buns
4 tsp Dijon mustard
Mix the burger ingredients together. Allow to stand for 3-5 minutes.
Spray a frying pan with the cooking spray and heat over a low-medium heat.
Form the tuna mixture into 4 patties. Cook until crispy on one side then flip and cook until crispy on the other side.
Serve on the buns with cucumber and Dijon mustard.
Subscribe to:
Posts (Atom)